Using QuickBooks Online’s Customer Records

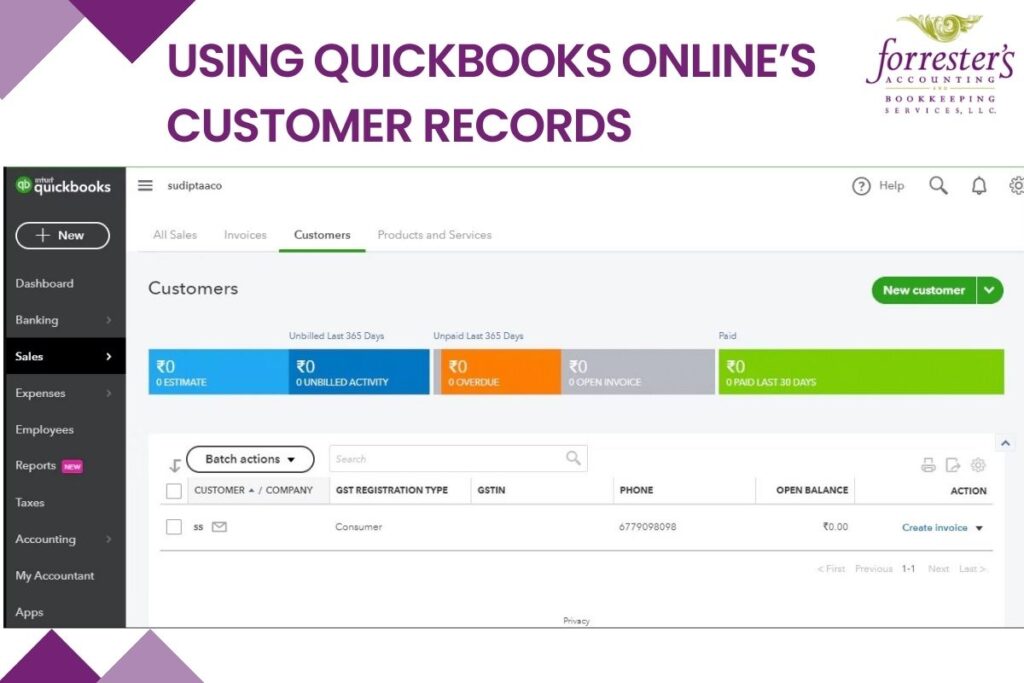
Using QuickBooks Online’s Customer Records

Your customers are your company’s lifeblood. Are you managing those relationships carefully? Here’s how QuickBooks Online can help.

If you’ve been in business long enough to remember tracking your customers manually, you probably rememberwhat a nightmare it was. Maybe you had a card file and paper folders – and lots of sticky notes and calendar notations.

Unless you had an unusually effective organization system, it was probably difficult to find historical transactions when customers called with questions, for example, and you may have experienced cash flow problems because it was hard to keep up with invoices and statements and payments.

If you’re already using QuickBooks Online, you know those days are over. But have you explored all the customer relationship management tools available to you on the site?

Thorough Records

The core of any good customer-tracking system is a comprehensive set of individual profiles. QuickBooks Online offers thorough, flexible record templates for just that purpose. Click Sales in the main toolbar, then the Customers tab at the top of the screen. To create a new customer record, click New Customer off to the right to open the Customer Information window.

Note: If you have your customer database in an existing Excel or .CSV file, you should be able to import it. QuickBooks Online provides instructions for this.


You can create a profile for each customer in the Customer Information window.

You’ll need to enter a lot of the information yourself here, mostly contact details. A down arrow next to a field indicates that there’s a drop-down list of options available.

The lower left quadrant of the screen contains a series of tabbed information windows. Click on each to enter what you can about each customer’s:

  • Address – both billing and shipping
  • Notes – any that you’d like to enter
  • Tax info – exemption details and default tax code (if taxable)
  • Payment and billing – preferred payment and delivery method, payment terms, and opening balance
  • Attachments –any files pertaining to this customer that you want to include

When you’re done, click Save. Your new record will appear in your list of customers. You’ll be able to toggle back and forth between the details you just entered and a list of their transactions.

Working with Customers

You can always add new customers as you go along, but it’s a good idea to enter records for all of them before you start creating transactions. It will save time down the road, and their accessibility will help with other accounting tasks.

When you click on Sales | Customers now, you’ll see something like this:

Your Customers page contains a list of customers with links to related activities. It also provides a color-coded row of bars that represent the status of invoices and estimates.

The Customers page consists of many elements. The main section displays a table of your customers. Click on one to open the page containing the Transaction List and Customer Details.

On this screen, though, you’ll only see columns for Customer/CompanyPhoneOpen Balance, and Action by default; click the gear icon in the upper right if you want to include more columns here. When you click on the down arrow next to a field in the Action column, a drop-down list will display the options available for that customer, like Receive paymentSend reminder, and Create Statement.

A series of colored bars runs across the top of the screen. Each represents the current status of a specific transaction type: EstimatesUnbilled ActivityOverdueOpen Invoices, and Paid Last 30 Days. Click on any of these to open a list of pertinent transactions.

You can do all of these activities elsewhere in QuickBooks Online, but it’s convenient to be able to work directly from the Customers screen, too. The fewer clicks, the better.

Call on Us

Did you make a resolution to start using QuickBooks Online this year? The site was built for use by business managers, not accountants, but it can still be a little daunting at first. We’re always available to take your questions and help you with setup and/or daily implementation. Connect with us if you need assistance.

Social media posts

New to QuickBooks Online and a bit confused? I can help you with setup and implementation. Contact us today.

Have you created profiles for all your customers? QuickBooks Online contains record templates to accommodate this.

Want a quick look at the status of your sales transactions? Click Sales | Customers.

You can do a lot of your sales tasks by accessing the Customers page. Click the Sales icon in the navigation bar. Questions? Call us.

Working with Downloaded Transactions in QuickBooks Online

Working with Downloaded Transactions in QuickBooks Online

Downloading transactions into QBO is the easy part. You still have work to do once they’re on board.

Its ability to download financial transactions is one of the five best things about QuickBooks Online. Without it, you’d spend a lot of time on tedious data entry, verifying which checks and deposits had cleared and entering new ones.

Instead, you can easily connect to your bank and bring in all your activity from the previous hours or day. QuickBooks Online stores this neatly in a register and provides tools for you to further describe and classify each transaction.

Setting Up the Connection

Haven’t connected your financial institution to QuickBooks Online yet? It’s easy. Click the Banking link in the toolbar, then Add Account in the upper right. The Find your bank window opens. Start entering the name of your bank, credit card company, or service like PayPal in the blank field. A list of potential matches will drop down; you simply select the one you want. A window like this will open:

All you need to do to start downloading transactions into QuickBooks Online is select your financial institution and enter the User ID and Password you use to connect directly to the site.

You will have to go through some security procedures, and then QuickBooks Online will download 90 days of transactions (you can shorten this if you’d like). You’ll also be asked which QBO account should receive the transactions. After a few minutes, the register for that account will appear, displaying the transactions you just downloaded.

Warning: The mechanics of connecting to your bank and downloading your first batch of transactions may sound easy, but if everything is not absolutely clear to you as you’re going through the process, please contact us sooner rather than later.

Working with Transactions

Once you’ve downloaded a set of transactions, you’ll want to look at them. Again, click the Banking link in the navigation toolbar. Your accounts will appear in small boxes at the top of the page, along with two balances: the one that came from the financial institution and the one in QuickBooks Online. Select the one you want by clicking on it, and its register will open.

Tip: QuickBooks Online generally updates your accounts once daily. If you want to launch a manual update at any time, click on Update in the upper right corner.

Let’s look at one downloaded transaction to see what you can do with it. Make sure the For Reviewcolumn is highlighted above the register. Select a transaction by clicking on it. A window like this will open below it:

QuickBooks Online does more than simply download financial transactions: It lets you define them in greater detail.

There are several options here, including:

  • Add to register. If you’re satisfied with the information as is, just click the Add button to the right (not pictured here).
  • If you want to split the amount/category (SuppliesTools, etc.)/class of a transaction, click Split (also off to the right and not pictured). A window will open to let you specify that.
  • Assign categories. QuickBooks Online may automatically make assignments to obvious categories, which you can change if incorrect. You can also click the down arrow to the right of that field and select your own from the list.
  • Bill an expense to a customer. Did you purchase something that needs to be billed to a customer? Click in the box under Billable and select the correct one from the drop-down list that opens.
  • Find matches. This can get complicated, and we recommend you let us work with you on it. Let’s say you entered an invoice in QuickBooks Online, and an income item for that exact amount gets downloaded from your bank. QBO will assume that those two “match,” and display them in the In QuickBooks You can click Undo if this is incorrect. But you can also click Find match in the transaction window, and QBO will open a list of possibilities.

As you can see from browsing the lists of downloaded transactions, there’s a lot to learn here. We’d be happy to get together and walk you through your first explorations of these powerful features.

JACKIE IS A LIFESAVER

Jackie has been a lifesaver for me as a local small business owner. I contacted her early out of fear for Accounting and Bookkeeping services as I stepped into the business world. Jackie is not one of those people that just fixes things for you, however if you need that then she is also your person as well! She takes the time to explain options and why you would classify things the way she does so you truly understand. As a Franchise owner, you are given business guidance but there is minimal help on truly understanding the numbers of your business. From bookkeeping, reconciling, anything Quickbooks, and even budgeting tutorials, Jackie Forrester is the best around. Thank you Jackie for helping me get off to a wonderful start and helping me sleep better at night!

Lindsey M. Walnut Creek, CA

Setting Up Sales Tax in QuickBooks Online

Sales tax is one of the more complicated concepts supported by QuickBooks Online.

QuickBooks Online was designed for you, the small businessperson. You’ve probably discovered that many of its features are fairly easy to use from the start.

But just because QuickBooks Online can do something doesn’t mean you should attempt it on your own. Sales tax is one of those things. Depending on your geographical location, you may have to charge not only state sales tax, but also county and city/municipality taxes (and sometimes special taxes). If you’re selling products or services to customers in other states, your situation can get very complicated.

We’ll show you some of the mechanics involved, but we strongly recommend that you let us help you with this.

Setting Up Sales Tax

We’ll describe the process of setting up sales tax rates so you can see how it will work. Click the Taxes link in the toolbar. The new screen should open to the Sales Tax Center; if it doesn’t, click its link in the toolbar above. In the right vertical pane, under Related Tasks, click Add/edit tax rates and agencies. Then click New to open this window:

new-sale-tax

You can define either a Single tax rate or Combined tax rate in this window.

You’d enter the Tax nameAgency name, and Rate in the designated fields if you’re just creating a Single tax rate. In some cases, you may have to enter a Combined tax rate. If so, click the button in front of that label. The window that opens contains fields that are similar to the ones in the above image, except that Tax name is replaced by Component name. You’ll choose this option when you have to record individual elements of the tax separately. For example, Ft. Myers | Lee County| Florida State.

To muddy things up even more, some items in some situations are exempt from sales tax.

Questions about the Combined tax rate? Contact us.

When you’re done, click Save. You’ll see the tax you just created in a table in the window that opens. To define a New tax, Edit an existing one, or Deactivate one in the list, click the appropriate button. If you’ve entered all you’ll need for now, click Return to Sales Tax Owed and Recent Payments.

Your Responsibilities

Once you’ve set up all the sales tax rates required for you, QuickBooks Online will calculate them for you in transactions where they need to be collected. You can see the running tally in the Sales Tax Center, but it’s up to you to create and record payments on the prescribed schedule. You can also run related reports here.

The site bases its calculations on three things:

  • The state(s) where you have obtained a sales tax permit(s),
  • Your company’s physical location, and,
  • The customer address on the sales form.

But QuickBooks Online can’t know the exact tax situation for all its users. You have to do some detective work before you even approach us for help setting up sales taxes. You’ll need to know, for example, whether your state taxes the products or services you sell. Also, what’s the sales tax rate(s) for the affected states? What agency collects it? When are the payments you’ve collected from your customers due?

Your state government’s website should cover all of this.

Sales Tax Settings

Before you start working with sales tax, you’ll also need to make sure your settings are correct. Go back to the Sales Tax Center and click Edit tax settings on the right side of the screen to open this window:

edit-sale-tax

To save time, QuickBooks Online lets you set some default sales tax actions.

Click the button in front of Yes after Do you charge sales tax? if it’s not already selected. If most of your transactions will use the same sales tax, you can set it as the default (but change it during transactions if necessary). If the majority of customers, products, and services will be subject to sales tax, you can check the boxes in front of the Mark all…statements (these designations, too can be edited in individual transactions).

You can see that using QuickBooks Online’s sales tax tools requires research, decisions, and extreme accuracy (state revenue departments run occasional audits). I have to stress again the importance of consulting with us if you need to take this on. It’s an exceptionally complex element of accounting, and we want to make it work for you.

JACKIE IS A LIFESAVER

Jackie has been a lifesaver for me as a local small business owner. I contacted her early out of fear for Accounting and Bookkeeping services as I stepped into the business world. Jackie is not one of those people that just fixes things for you, however if you need that then she is also your person as well! She takes the time to explain options and why you would classify things the way she does so you truly understand. As a Franchise owner, you are given business guidance but there is minimal help on truly understanding the numbers of your business. From bookkeeping, reconciling, anything Quickbooks, and even budgeting tutorials, Jackie Forrester is the best around. Thank you Jackie for helping me get off to a wonderful start and helping me sleep better at night!

Lindsey M. Walnut Creek, CA